

Using Edda
Now that you have Edda installed, let’s make a map!
- Setting up your song
- Getting to know the UI
- Creating a map
- Setting up song timing
- Setting up map info
- Mapping Notes
Setting up your song
Choosing a good song
Every map needs a good track, so before we start placing notes we need to pick a good song.
Ragnarock is designed for metal genres but works great with many kinds of loud, energetic songs.
Be careful when mapping quiet songs, such as background music or “chill” songs - they may not work as well as you expect.
Getting a song file
Once you’ve settled on a song, you need to get an appropriate file to use for mapping.
Edda requires the song file to be in Vorbis format. Files with the Vorbis format are characterised by a .ogg file extension.
NOTE: Some
.oggfiles may rarely use the Opus codec, which is not supported by Edda.
If you haveffmpeginstalled, you can quickly check the codec by usingffmpeg -i input.oggand reading the output.
If you can’t find an .ogg file, you’ll have to make one yourself by converting from an audio file with a different format (such as .wav or .mp3).
There are plenty of applications that can do this:
- Audacity is a popular user-friendly tool.
- If you know how to use command-line tools, ffmpeg will do the job faster.
NOTE: If you use a music streaming service like Spotify or Apple Music, you can play the song you want on your computer and record it to a file. You can do this in Audacity by setting your microphone input to your headphone/speaker output and starting a recording with the song playing.
Lossless encoding
If possible, you should obtain a lossless audio file (e.g. .wav or .flac) and transcode it into Vorbis format (.ogg).
You should aim for a quality preset somewhere from 5 to 9.
The quality 10 preset produces unnecessarily large files, and anything under quality 5 may sound noticeably poor. For reference, Spotify Premium uses quality 9.
You can set the quality
- in Audacity, by using the slider in the file save dialog (after you click “Export to OGG”).
- in ffmpeg, by using the
-qflag, e.g.ffmpeg -i input.wav -q 9 out.ogg.
Lossy encoding
If you can’t get a lossless file, you may have to make do with a lossy file (e.g. .mp3).
The easiest way to get one is via YouTube. There are plenty of websites that will take a YouTube link and turn it into an .mp3 file for you.
You can then transcode to Vorbis format by using Audacity or ffmpeg as described above in Lossless encoding.
NOTE: If possible, you should aim to get lossless files. Lossy files and in particular lossy-to-lossy transcoding will result in worse sound quality.
If you can’t find a lossless file, don’t worry. It will be hard for most players to tell the difference, especially with Ragnarock’s drum sounds playing over the music.
Getting to know the UI
Go to the folder you extracted Edda to, and open Edda.exe.
You’ll be greeted with a start screen.

Let’s start off by clicking the “New Map” button at the top.
First select a folder to store your map in. Ragnarock uses the directory Documents/Ragnarock/CustomSongs, so a good starting point is to create a folder in there and use it.
Select your song file, in .ogg Vorbis format.
Edda’s main editor window will pop up. It’s time to start mapping!
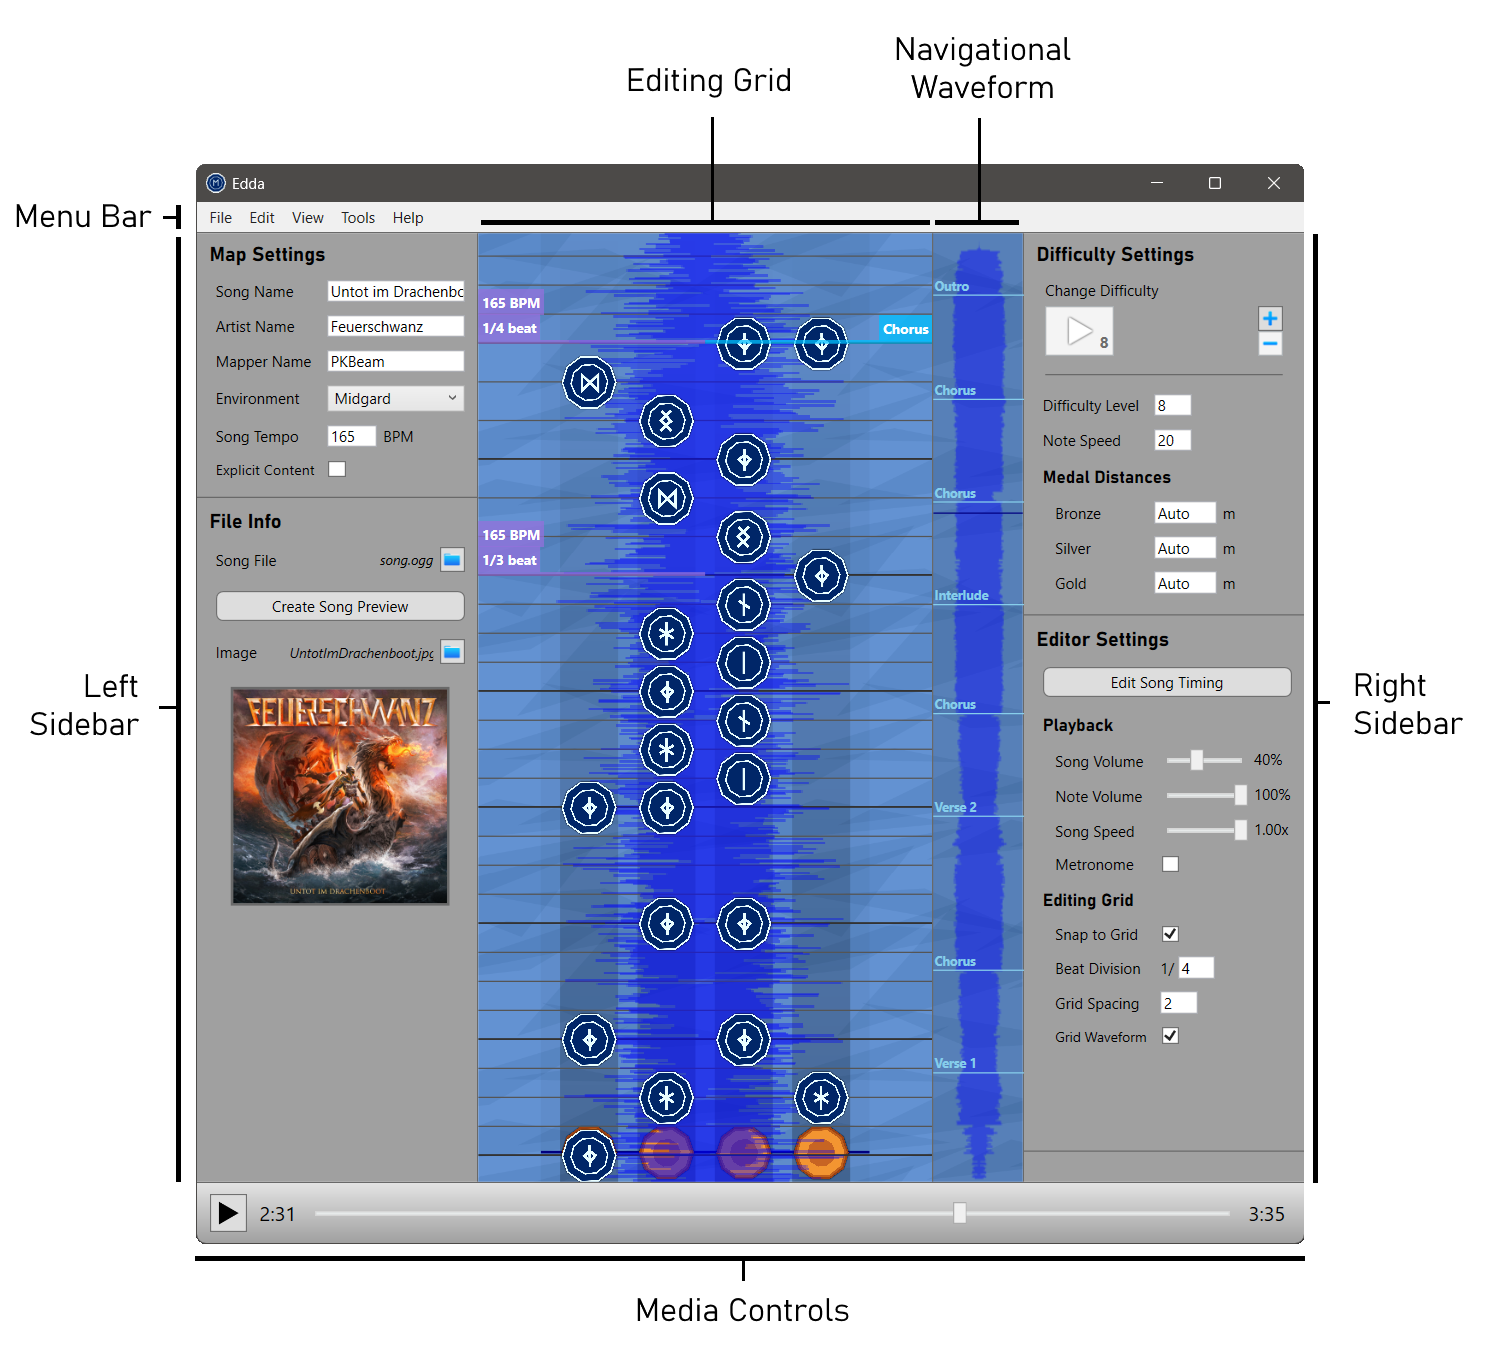
NOTE: As of v1.1.0, the toolbar is replaced with a traditional menu bar. The menu bar offers the same functionalities as the toolbar, in addition to exposing useful shortcuts for other functions.
Let’s have a closer look at the editing grid, since we’ll be working with it a lot.
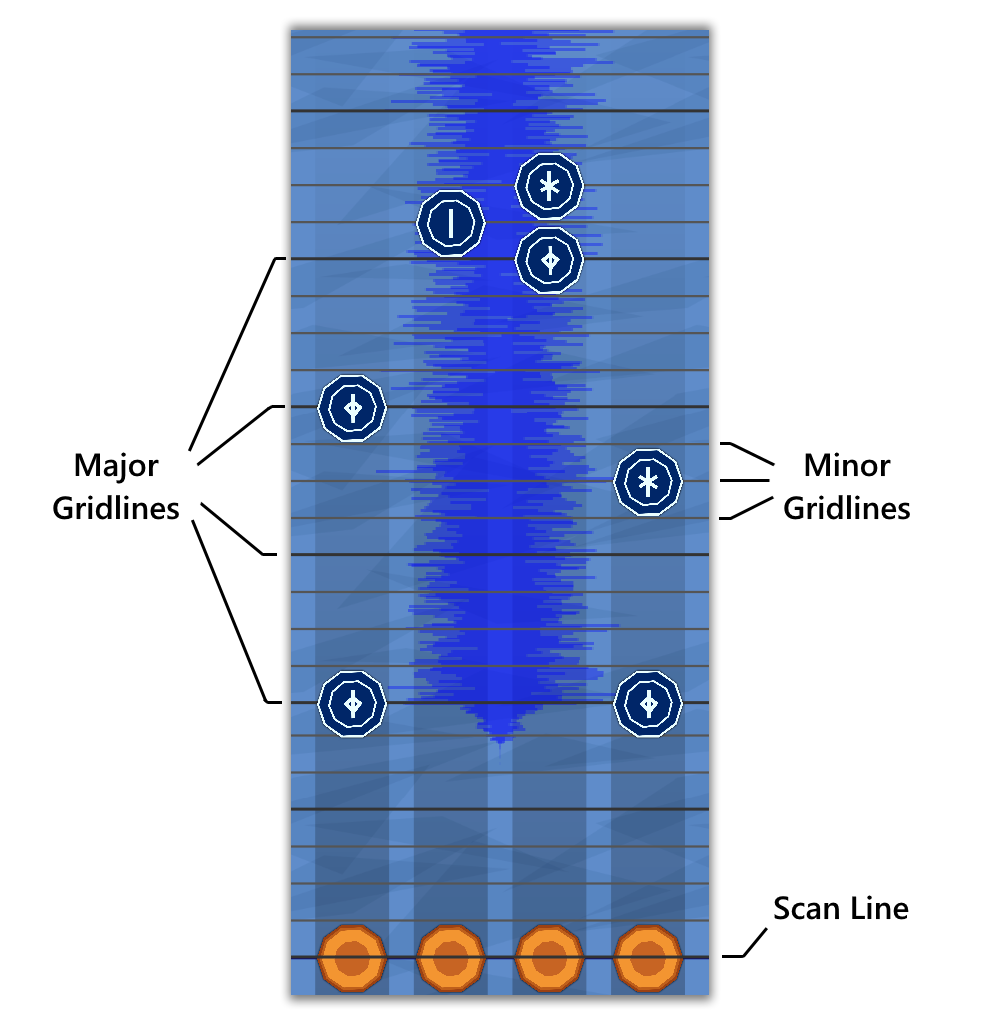
The scan line is marked by four drums. This represents your current position in the song (consistent with the slider in the media controls). When you play back your map, it will start from the scan line.
The editing grid contains many gridlines - these are where you’ll be placing your notes.
The darker gridlines are called major gridlines. These gridlines represent the start of a beat in the song.
The space between the major gridlines are divided up into sub-beats by minor gridlines.
For most of this grid, the beats (major gridlines) are divided into four sub-beats.
We call this a Beat Division of 4 (or 1/4), which you can specify in the right sidebar.
The Grid Spacing is a multiplier that affects the space between gridlines.
This can also be found in the right sidebar. The default value is 2, but you can increase this if the gridlines are too cramped, or lower it if you want to fit more of the map on the editing grid.
Setting up song timing
Finding the song BPM
Let’s find out the BPM of our song.
Go to “Tools” > “BPM Finder” in the menu bar.
Play the song in Edda, then bring up the BPM finder window and tap any key to the beat.
Once you feel that you’ve tapped enough beats, look at the average BPM displayed and put it in the Song Tempo under the left sidebar of the main window (you might want to round it to the nearest integer).
Aligning the song
Edda assumes the start of the song file is the first beat, but most song files don’t begin exactly on a beat.
There are two ways we can resolve this issue.
The first is to trim the song file beforehand using something like Audacity or Arrow Vortex. This can be tedious to do.
The second solution is to place a timing change at the start of the first beat in the song. This is a lot easier, so let’s go through this.
Move your mouse over the editing grid and press Ctrl-T. A purple marker will appear on the grid, which you can drag to align with the start of the song. Make sure the displayed BPM and beat divisions are correct; you can edit these by right-clicking them. Timing changes can be deleted with a middle-click.
You can snap a timing change to the grid by holding Shift while dragging or using Ctrl-Shift-T. This is useful when you only want to change the beat division and not the BPM.
NOTE: You can view all timing changes at once and edit them by clicking the “Edit Song Timing” button in the right sidebar.
Checking the song’s timing
Your song should be ready to map now, but let’s check that the timing is correct.
Turn on the Metronome feature in the right sidebar. Now play them back using the Play/Pause button in the media controls (or by pressing the spacebar).
Does the metronome sound like it’s synchronised to the music?
Be sure to check both at the start and at the end of your song:
-
If you’ve made an error placing the BPM change at the start of your song, it will become obvious there.
-
If you’ve made an error specifying the Song Tempo, it will be easiest to find out at the end of the song - that’s where all the BPM errors will accumulate.
Make sure your timing is as close to perfect as possible before you move on - you don’t want to come back after placing thousands of notes to find that there’s a mistake with the timing.
NOTE: If you are having audio sync issues, check out the page on Audio Latency.
Setting up map info
Before we start placing notes, we need to fill out some details about our map.
Map Settings and metadata
In the left sidebar under Map Settings, fill out the Song Name, Artist Name and Mapper Name.
Choose an Environment for your song - this is the world your ship will row in when you play the song in-game.
Under File Info, click the button with a folder icon next to the Image field. Choose a cover image for your map - this will be displayed in-game.
NOTE: If you want to change the song file in your map, select the button with a folder icon next to Song File, under File Info.
Song Preview (optional)
The preview is what plays in-game when you select a song. It should be shorter than 15 seconds and it should showcase the best part of your song, for example the chorus.
You don’t need a preview for your song to be playable, but it’s a good idea to have one. If you don’t provide one, the game will automatically play first few seconds of your song instead.
Using the media controls in the bottom of Edda’s main window, pick out the start and end times of what you want the preview to be.
Under File Info, click the “Create Song Preview” button. Put in your start and end times, add a fade in and fade out duration (if you wish) and then click “Create Preview”. You can find the finished result in your map folder with the filename preview.ogg.
Bookmarks
The navigational waveform
Let’s take a look at the navigational waveform to the right of the editor grid.
The waveform of the entire song is displayed here, and the dark blue horizontal line indicates the position of the scan line (the current position).
You can scrub through the song by clicking on or dragging across the waveform.
The navigational waveform is a useful high-level overview of the whole song, and it’s where our bookmarks will go.
Managing bookmarks
Bookmarks are there to mark out important points in the song - for example, the start of a verse or chorus. Having bookmarks in a song makes it much easier to navigate.
You can create a new bookmark by positioning your mouse where you want the bookmark to go and pressing Ctrl-B.
You can mouse over either the editor grid (for more accuracy) or the navigational waveform.
Clicking on a bookmark in the navigational waveform will let you jump to that location in the map.
To rename a bookmark, right-click it.
To delete a bookmark, middle-click it.
NOTE: Edda’s bookmarks are fully compatible with MMA2’s bookmarks.
Difficulty Settings
The Difficulty Settings are located in the right sidebar.
Ragnarock maps come with up to three difficulties, indicated by 1-3 stacked triangles (more triangles means higher relative difficulty).
You can add or delete difficulties using the “+” and “-“ buttons.
You can switch to another difficulty by clicking on the large buttons with icons in them. The button that is disabled (greyed out) is the difficulty you have currently selected.
You don’t have to worry about rearranging your difficulties - Edda will sort them for you.
Each difficulty has a Difficulty Level, Note Speed, and Medal Distances.
The Difficulty Level is a number from 1 to 10 (inclusive) that represents how hard the map is. You should be familiar with this number if you’ve played Ragnarock before.
The Note Speed is how fast the runes approach you when you play the map in-game. The value you set here is the default one used by the game, but the players can override it with the “Custom Rune Speed” setting. You’ll have to experiment with this in the game to get a feel for what the numbers mean. A good place to start is 15, which represents an average speed. You can increase this a few units to make the notes approach even faster. The maximum value Ragnarock allows players to set is 30, but you can set it even higher in Edda, although you’ll need to inform the players that they have to disable “Custom Rune Speed” to see the intended effect.
Medal Distances represent how many metres your boat must row in order to achieve a certain medal. In most cases, you should leave these set to “Auto” so that Ragnarock will automatically calculate medal distances for you.
Mapping Notes
Now that everything else is set up, let’s start placing notes.
While you map, it might be helpful to refer to the Grid Waveform and Spectrogram.
Basic controls
The editing grid is where you’ll be placing notes.
To add a note on the grid, just left-click where you want the note to go.
NOTE: You can also use the
1,2,3and4keys to add notes. Unlike mouse controls, you can add notes in this way while the song is playing (the notes will be added on the scanline instead of on your mouse position).
By default, Edda will snap your placed notes to the gridlines. If you don’t want this behaviour (for example, if you want to place arpeggiated notes), you can disable it by toggling the Snap to Grid checkbox in the right sidebar or by pressing Ctrl-G.
To remove a note, simply right-click it.
Selecting notes
You can select notes by either clicking them individually or dragging across the editing grid (to select multiple notes).
If you hold down the Shift key while selecting, you can add to your selection instead of clearing it.
Once you place some bookmarks or timing changes, you can click them while holding Ctrl to toggle selection of all the notes between that bookmark/timing change and the next one, to quickly select whole sections of a map.
Pressing Ctrl-A will select every note on the map.
Pressing the Escape key will clear your selection.
Edda provides several ways to manipulate note selections:
- Cut (
Ctrl-X), copy (Ctrl-C) and paste (Ctrl-V) are supported. - The
Deletekey will remove all selected notes. - You can use
Ctrl-Mto mirror the notes. - You can move notes one column to the left/right by using
Shift+LeftorShift-Right. - You can move notes one gridline forward/backward by using
Shift+UporShift-Down. - You can move notes one beat forward/backward by using
Ctrl+UporCtrl-Down.
Edda also supports undoing (Ctrl-Z) and redoing (Ctrl-Y or Ctrl-Shift-Z) of these operations.
Note playback
Once you’ve placed some notes, you should play back the map to see how it sounds.
You can use the media controls to do so, or press Space to play/pause the song.
It may be helpful to adjust the Song Volume and Note Volume in the right sidebar to help you hear notes properly.
To slow down or speed up the song, adjust the Song Speed slider in the right sidebar.
Spectrogram
Spectrogram is a useful tool that visualizes the frequencies present in the audio. Drum beats will generally cause a characteristic “peak” to be visible on a spectrogram, so you can use it as a guide for the timing of your notes.
There is a small bar between Spectrogram and Editing Grid that can be clicked and dragged to resize it if you need to get a closer look.
Spectrogram can be enabled/disabled in the settings. Further options for configuring it are explained on Spectrogram advanced settings page.
Map Stats
During the mapping process, you’ll be able to see some useful stats in the left sidebar: number of notes of different types, what percentage of notes are in each column, and how many notes per second players will have to hit.
If you configure the difficulty predictor in the settings, you’ll also see an estimation of the map difficulty.
Exporting your map
Once you’re done with mapping, you can go to “File” > “Export Map” in the menu bar, and Edda will create a .zip file for you that can be uploaded to Ragnacustoms.
Backups made by Edda will not be copied over into the .zip file.
Now you’re done with the basics of Edda!
You can now dive right in to making your own map, or continue to Advanced Topics for further reading.